first design: A - 2 long short upper:
2 x 40' + 1 x 20' containers
I had just begun using Google SketchUp so my first design was simplistic for two reasons; I was still unfamiliar with using SketchUp and secondly, I hadn't by this stage researched much about shipping containers and what can and can't be done with them. These are a few snapshot from that first design.


===================================================================
second design: B -xy house
3 x 40' containers = 2 x 40' for studio/workshop
notice the ute!!


===================================================================
third design: C -hacienda style
4 x 40' + 2 x 20'
I briefly flirted with the idea of an enclosed internal courtyard. But someone asked me why I would need this if, as intended, I was building in the country on a sizeable block of land. This made sense so I dropped the idea. It was for the same reason that I stopped (most of the time) designing houses with a second storey. Unless there is a fantastic view to warrant it, why have stairs if you don't need them?


===================================================================
fourth design: D - arched carport
2 x 40' + 1 x 20'
I soon came to realise that the cost difference between a 40' and a 20' container is negligible. As of 6th April 2011 a 20' standard grade container costs AU$2,150 (US$2,228) whereas the 40' costs AU$2,290 (US$2,373) It seemed pointless to use 20 footers from then on.
(I continue to use 20' and 40' as measurement despite being metric as this is the standard measurements for containers.)
By this stage I began to think about things such as solar power, rainwater collecting and building alignment. Also I started to consider external cladding styles and materials, and what would suit the climate and conditions. I had also been adding a studio workshop - a priority for my intended build. A simple 2 x 40' container studio seemed more than sufficient.


===================================================================
fifth design: E - barn style
I returned briefly to a two storey design and was experimenting with creating space by separating two containers and utilising the space between to increase living areas. This design uses 4 x 40' containers, 2 per floor. This was also my first try at making a staircase and a dam!


===================================================================
sixth design: F- wave roof
4 x 40' containers.
Outside cladding I considered using stained marine ply separated by aluminium "U" profile channel. Roofing is corrugated iron and used to collect rainwater for the water tank.
It was about this time I began to consider the layout of rooms to keep all the wet areas, or places that required plumbing, together. This I figured would cut down costs and would not need plumbing and piped running all over the site.


===================================================================
seventh design: G - collage house
3 x 40' containers


===================================================================
eight design: H - collage with upper storey
3 x 40' ground floor + 2 x 40' upper storey
Not quite done with an upper level - but this I think was just whimsical play and thinking if the building plot had great views.


===================================================================
ninth design: I - wedge house
3 x 40' ground floor + 1 x 40' upper floor
whilst on the 2nd floor idea I whipped up this little number.


===================================================================
tenth design: J - house and pool
4 x 40' + 1 x 40' for pool
This was the first design that I was really happy with. I also came up with the idea to use a half buried container as a lap pool. (Not an original idea as I later found out!)
I was becoming a lot more skilled and confident at using SketchUp which made planning a lot easier. It was around this time (about 2 months after starting to use SketchUp) that began to try designing my own pieces of furniture.


eleventh design: K - june minimal
3 x 40' containers
By June I began to seriously think about what it was about architecture that I really loved. And what I didn't!
I came across Farnsworth House by Mies van der Rohe and it seemed to sum up for me the essence of what I wanted. It became a sort of blue print for most of my ideas from there on in. This proportions of this style of modern architecture seemed to lend itself perfectly to shipping containers!
 | |||||
| Farnsworth House by Mies van der Rohe 1951 |
Of course, the similarity really only extended to the facade of my design. But the Minimalist bug had bitten!


===================================================================
twelfth design: L - august min 1 bed
3 x 40' containers
Varying the previous design by taking into consideration factors such as shade, position of container's structural elements, and the need for external insulation. (This stops reducing internal width with bulky insulation.)


===================================================================
thirteenth design: M - august min 2 bed
3 x 40' containers
Variation on previous design with the addition of a second bedroom and a dual entry bathroom

youtube animation
===================================================================
fourteenth design: N - aug min 2 bed extension
3 x 40' containers
The same as the thirteenth design except with the addition of a clerestory and some inexplicable 'blades' on the front windows!


===================================================================
fifteenth design: O - august clerestory
3 x 40' containers
A shift away from previous designs playing with sloping rooves and a clerestory. Ultimately I was quite dissatisfied with this design.


===================================================================
sixteenth design: P - September 2
3 x 40' containers
Back to the Mies inspired designs, this one works on refining room, wall and window positions.


===================================================================
seventeenth design: Q - sept 2 + terrain
3 x 40' containers
Further refinements on a familiar design. Added a bit of fancy terrain to see what the place would look like in a landscape.


 A f
A f


===================================================================
eighteenth design: R - sept new terrain
3 x 40' containers.
A few further refinements.


===================================================================
nineteenth design: S - oct 29
3 x 40' containers.
This design has a few variations within the one basic plan. I have settled on keeping the solar panels off the roof for aesthetic reasons, and they only miss a couple of hours of sun early in the morning. I tried a couple of widths on the front facade, and also tried it with a clerestory, and giving the main bedroom an extra window on the front.


===================================================================
4 x 40' containers
Some minor changes and I have used a fourth container to make a quick and easy back verandah.


===================================================================
twenty first design: U - oct + clerestory
3 x 40' containers
previous design plus clerestory


===================================================================
twenty second design: V - oct end
3 x 40' containers
This design staggers the two main containers and creates quite a different internal configuration. It makes an 'L' shaped main bedroom with a private deck, a guest bedroom and two bathrooms. Space is sacerificed from the main living room.


===================================================================
twenty third design: W - oct 4 containers
4 x 40' containers
A development on my 20th design with the expansion of the living area by the addition of a 4th 40' container. This allowed enough space for an office room or possible spare bedroom/study.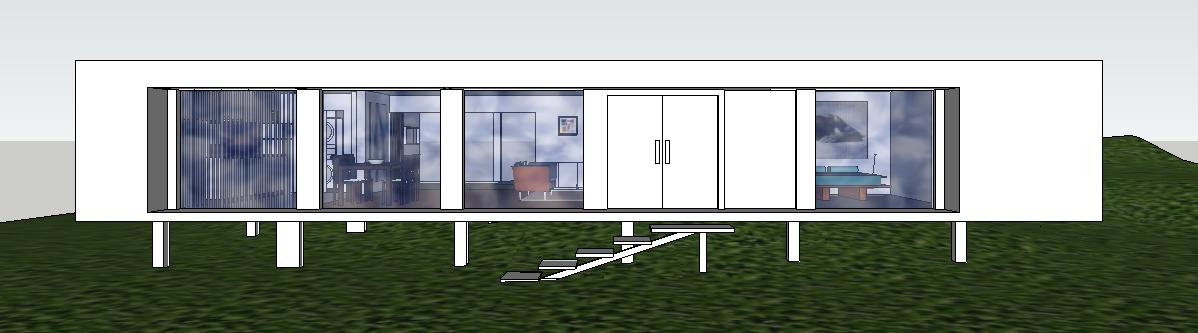


===================================================================
twenty fourth design: X - december
3 x 40' containers
Further refinements on what has become the standard style. This design includes a pool alongside the house, side decking, door out of main bedroom and inclusion of solar water panels.


===================================================================
twenty fifth design: Y - late dec cont
4 x 40' containers.
This design varies from previous ones with the additon of an extra container. This provides enough space for two bedrooms - one with an en-suite and a study, and each bedroom gets a private deck.


===================================================================
twenty sixth design: Z - january 2011
4 x 40' containers
This configuration creates a much larger living area. But I think there is too much wasted space. Sometimes it isn't until i finish a design that I begin to see its failings. I think the previous design makes a much more creative use of the same floor area.


===================================================================
twenty seventh design: ZA - february 2011
4 x 40' containers
Once again I tried introducing an internal courtyard after seeing a glass 'intrusion' into a house wall that brought the garden 'inside' the house. I like the idea so I tried a similar effect using a courtyard. Two sets of two containers set apart and filled in on two sides leaving the central area empty. There is also only a small decking area on one side of the house which is made up for by a courtyard seating area.


===================================================================
twenty eighth design: ZB - march 2011
4 x 40' containers
This is the basic "L" shape design - 2 sets of 2 containers at right angles to each other.
The only difference/drawback is that the kitchen is the other end of the building to the bathrooms. I prefer to keep all the 'wet' areas together. I might need to redesign this and put the litchen at the other end. Or have another water tank where the store room is and have half the roof draining one way into one tank, and the other half fills the second tank. And after all the kitchen doesn't need as much water as the bathrooms and laundry.


===================================================================
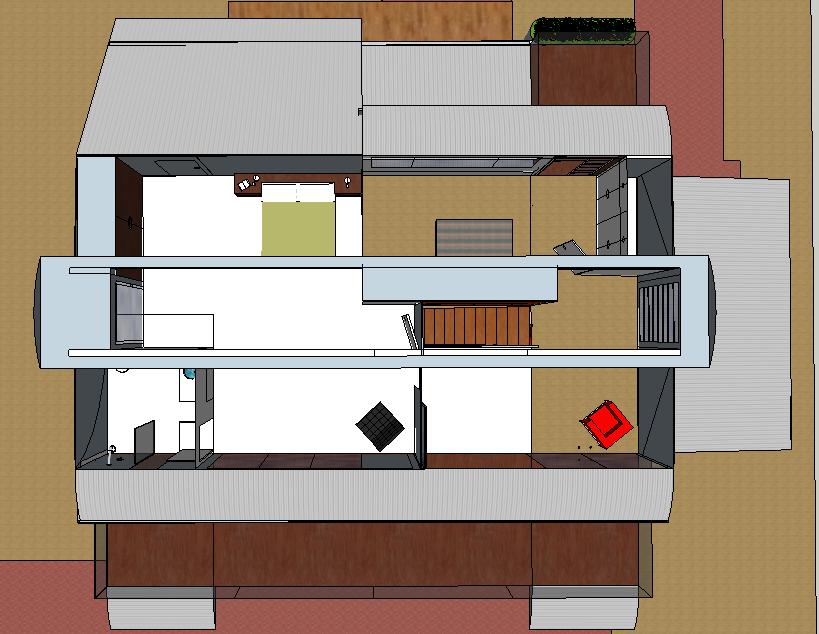
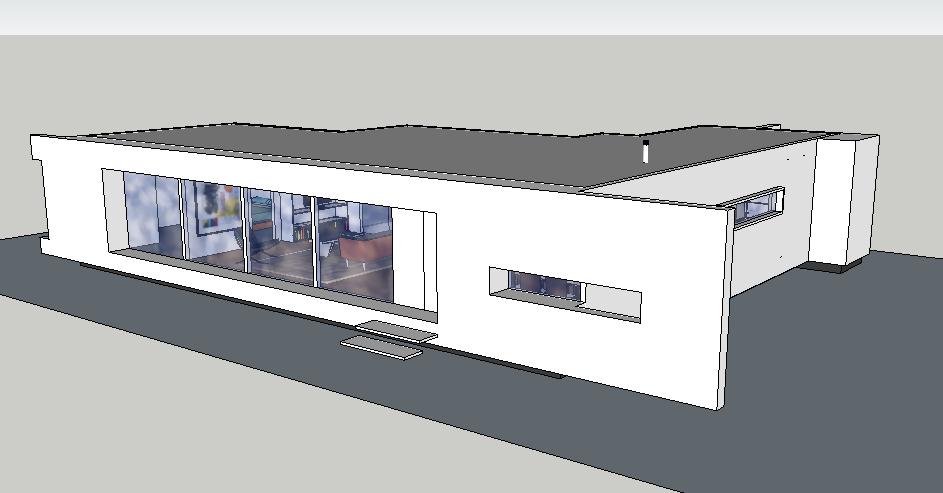
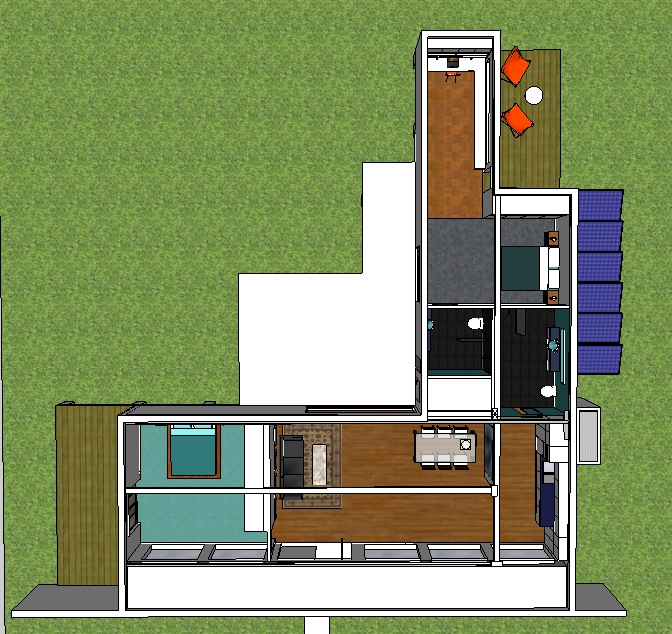
twenty ninth and FINAL design: ZC - may 2011
4 x 40' containers
This design reverts back to the 26th design and is now the layout that I have finally decided to go with. Spatially it satisfies all of my needs and requirements with very little wasted space. The only real difference is the look of the facade. I decided I liked the idea of a long low building so I have increased the frontage with most of the facade being non-essential building, therefore it does not require insulation, but will provide shading for the front windows and hide the small deck area outside the main bedroom on the right as well as the large watertank on the left. This facade will also hide two cupboards or walk in storage areas for garden related tools and implements.


